Description
The signoImager 2 can be used to capture signatures and copy them or save them as a graphic automatically or manually in the file system.
The application is described below.
User interface
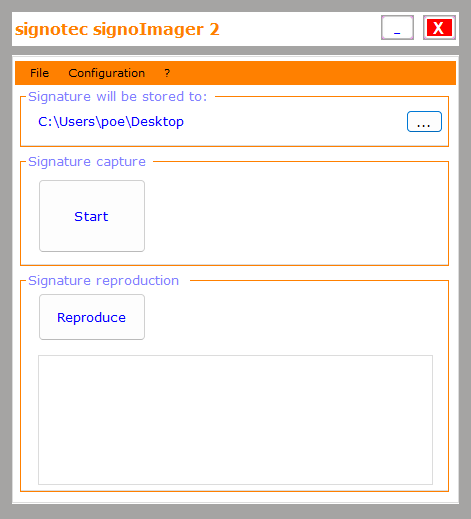
The application can be opened by means of the link “signotec signoImager/2”. As soon as signoImager2 has started, the following dialog is displayed.
The menu bar contains the following sections.
-
“File” can be used to exit the application. (Alt + F4)
-
“Configuration” opens the settings. (F3)
-
“?” displays the info window. (F1)

Main window
A directory for storing the collected signatures as graphics is specified under the menu bar.
The directory can be predefined in the settings. If the directory is changed in the main window, this change only applies temporarily until the next restart of the application.
Click the “Start” button to start the signature capture process.
Once a signature has been provided, you can click “Reproduce” to display it again.
Settings
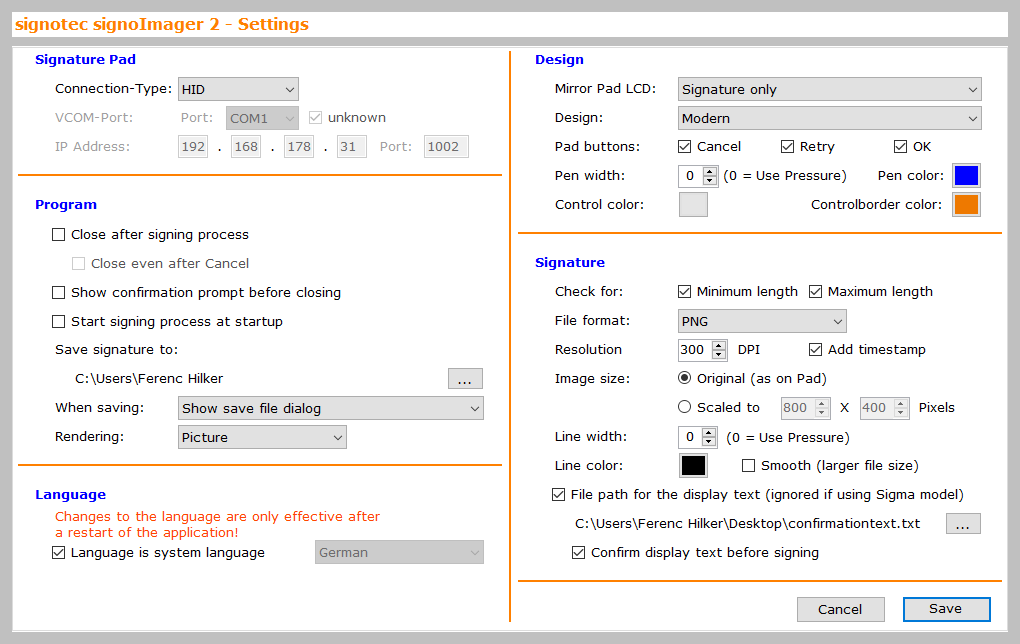
The settings contain numerous options for configuring the signoImager 2. All settings are explained in the following sections.

Signature pad
You use the Connection-Type setting to specify the type of pad you want to use for capturing the signature.
|
Option |
Description |
|---|---|
|
HID |
The signature pad is connected to the computer locally via USB. |
|
VCOM |
A signature pad is being used via a virtual serial connection (FTDI or VCOM port driver). If this option is selected, the desired port (COM1–COM256) can be selected under “VCOM port”. If the port is unknown, the button “Unknown” is activated. In this case, the software will search for devices automatically and use the first one it finds. |
|
IP |
The signature pad is connected via Ethernet (IP). If this option is selected, the IP and the port of the signature pad must be entered under “IP address”. The IP address and the port are configured in the service menu of the device or IP adapter. |
Program
|
Option |
Description |
|---|---|
|
Exit after signing process |
Specifies whether the signoImager 2 is exited automatically once the signature is captured, confirmed and saved. |
|
Exit even after cancel |
Specifies whether the signoImager 2 is exited even after cancellation of the capture or saving. |
|
Show confirmation prompt before exiting |
If you have specified that signoImager2 should exit after the signature has been captured, a query dialog can be displayed to the user to ask whether they are sure that they want to exit the application. |
|
Start signing process at startup |
If this setting is activated, signature capture is started as soon as the signoImager2 has started up, provided that the configured signature pad could be found. |
|
Storage location |
Specifies the folder in which to store the signature. The folder is displayed after the application has started up as standard and it can be changed temporarily by clicking the “…” button in the main window. |
|
When saving |
Specifies which action should be performed during the saving process.
Default value: Open “Save as” dialog |
|
Signature rendering |
Once the signature has been provided, it can be displayed again. The signature can be rendered as either a complete image or in real time.
|
Language
The application language can be adjusted. The system language is used as standard.
To set a language other than the system language, the setting “Language corresponds to system language” must be deactivated to enable one of the languages displayed in the drop-down list to be selected.
If the language is changed, you must restart the application for the change to take effect.
Depiction
|
Option |
Description |
|---|---|
|
Mirror pad LCD |
Specified whether the signature dialog should be displayed on the PC and if so, whether the display of the pad should be mirrored. Off: The signature dialog is only displayed on the signature pad. There is no real-time display on the PC. Signature only: Only the signature is mirrored in the signature dialog on the PC. Total contents: The entire display of the signature pad is mirrored in the signature dialog on the PC. Default value: Signature only |
|
Design |
This setting can be used to define the design of the UIs on the signature device. |
|
Pad buttons |
Specifies which buttons on the signature device should be shown. If all UIs are deactivated, the signature can only be canceled, repeated or confirmed using the dialog on the computer. |
|
Pen width |
Specifies the width for the signature display in the signature dialog on the computer. You can select pen widths between 0 (variable width) and 10 (very thick width). This setting does not affect the display on the signature device. |
|
Pen color |
Specifies the color for the signature display in the signature dialog on the computer. This setting relates to the display in the dialog and on the signature pad. If has no effect on the signature that is saved. |
|
Control color |
Specifies the color for the background in the signature dialog on the computer. This setting has no effect on the display on the signature pad and only applies if the mirroring is set to “Signature only.”. |
|
Dialog border color |
Specifies the color for the border of the signature dialog on the computer. This setting does not affect the display on the signature pad. |
Signature
|
Option |
Description |
|---|---|
|
Check |
The options “minimum length” and “maximum length” can be used to specify whether the signature that has been provided should be checked for minimum and/or maximum length. If one or more of the options has been activated and the signature provided is too short or too long and therefore likely invalid, an error message is displayed. |
|
File format |
Specifies what image format should be used for saving the signature:
|
|
Resolution |
Specifies what resolution should be used for saving the signature. A value between 75 DPI and 600 DPI can be entered. |
|
Add timestamp |
Specifies whether a timestamp with the current date and time should be added to the graphic of the signature. |
|
Image size |
Specifies what size should be used for saving the signature image. Either “Original size (on pad)” or a fixed scaled size in pixels can be chosen. If the original size option is selected, the resolution is based on the captured signature and the set DPI. |
|
Line width |
Specifies what pen width should be used for saving the signature. You can select pen widths between 0 (variable width) and 10 (very thick line width). This setting does not affect how the signature is displayed on the signature device or in the signature capture dialog on the PC. |
|
Line color |
Specifies what color should be used for saving the signature. This setting does not affect how the signature is displayed on the signature device or in the signature capture dialog on the PC. |
|
Smooth (larger file size) |
Specifies whether the edges should be smoothed in the saved signature image to achieve a smoother look. This optimization increases the size of the file. |
|
File path for the display text (ignored for Sigma model) |
A confirmation text can be shown on the signature pad’s display before or during signing. You can incorporate this confirmation text via a text file. The display contained in this file will be displayed on the pad. Compatible models:
Only text files with the file format (*.txt) can be used. |
|
Confirm display text before signing |
Specifies whether the displayed text needs to be confirmed before signing. Activated: The text must be confirmed before the signature is captured. If the confirmation text is canceled, the dialog will close and no signature will be captured. Deactivated: The text is displayed in the background of the signature dialog but does not need to be confirmed explicitly for the signing process. |
Call with parameters
The signoImager 2 can be called via the command prompt with parameters that overwrite the program settings that have been made.
The signoImager 2 can be called with the following parameters. If multiple parameters are to be sent, they must be separated with spaces.
|
Parameter |
Description |
|---|---|
|
-i |
Enables multiple instances of the application. |
|
-prx |
Enables a defined image format to be set. The “x” stands for the various image formats and must be replaced with the desired option:
Example: “-pfpt” for a PNG image with transparency |
|
-dcx |
Enables selection of the connection type of the signature pad that is to be used. The “x” stands for the various connection types and must be replaced with the desired option:
Example: “-Dci192.168.100.100:1002” for using a IP-Ethernet-available pad at the pad address 192.168.100.100. Specifying the port (:1002) is optional. |
|
-m |
Enables a metadata file to be created and stored in the configured folder along with the image file. The file with file extension *.log is saved when the application is exited and contains information about the status OK, CANCEL or ERROR (with error text) in UTF-8 format. Message boxes are not displayed if the metadata file is used and the application is exited automatically in the event of an error. Existing metadata files are overwritten. |
|
-f“x” |
Enables a file name to be set for the image and metadata files. “x” represents the file name. The quotation marks are needed for file names containing spaces. Special characters that not permitted are replaced with an underscore. Example: -f“procedure 4711” creates an image file and a metadata file with the names “procedure 4711.png” and “procedure 4711.log.” |
