(Lite) First steps
This part of the manual explains the first steps with the signoSign/2 software using a simple example.
The first steps include
... installation of the software
... structure of the program
... capture of a signature
Comprehensive descriptions of the individual functions and areas are contained in the other sections of the manual and are not part of these first steps due to their scope.
Installation
First, the installation file for the signoSign/2 software must be downloaded via the download form at www.signotec.com and installed on the computer. Further information on installation can be found in the installation manual section.
Initial program start
The program can be started via the shortcut on the desktop or in the start menu.
Alternatively, the “signotec PDF Creator” printer can be used from almost any application and is installed together with the software. This virtual printer converts the print data into a PDF document and opens the created PDF file automatically with signoSign/2.
When starting for the first time, a dialog is displayed where you can choose between the “Lite” and “Pro” versions. After selection, the main window of the software is displayed.
Areas of application
The main window is divided into several areas. The following screenshot shows the different areas, highlighted in color and numbered. The table below contains a brief description of the respective area.
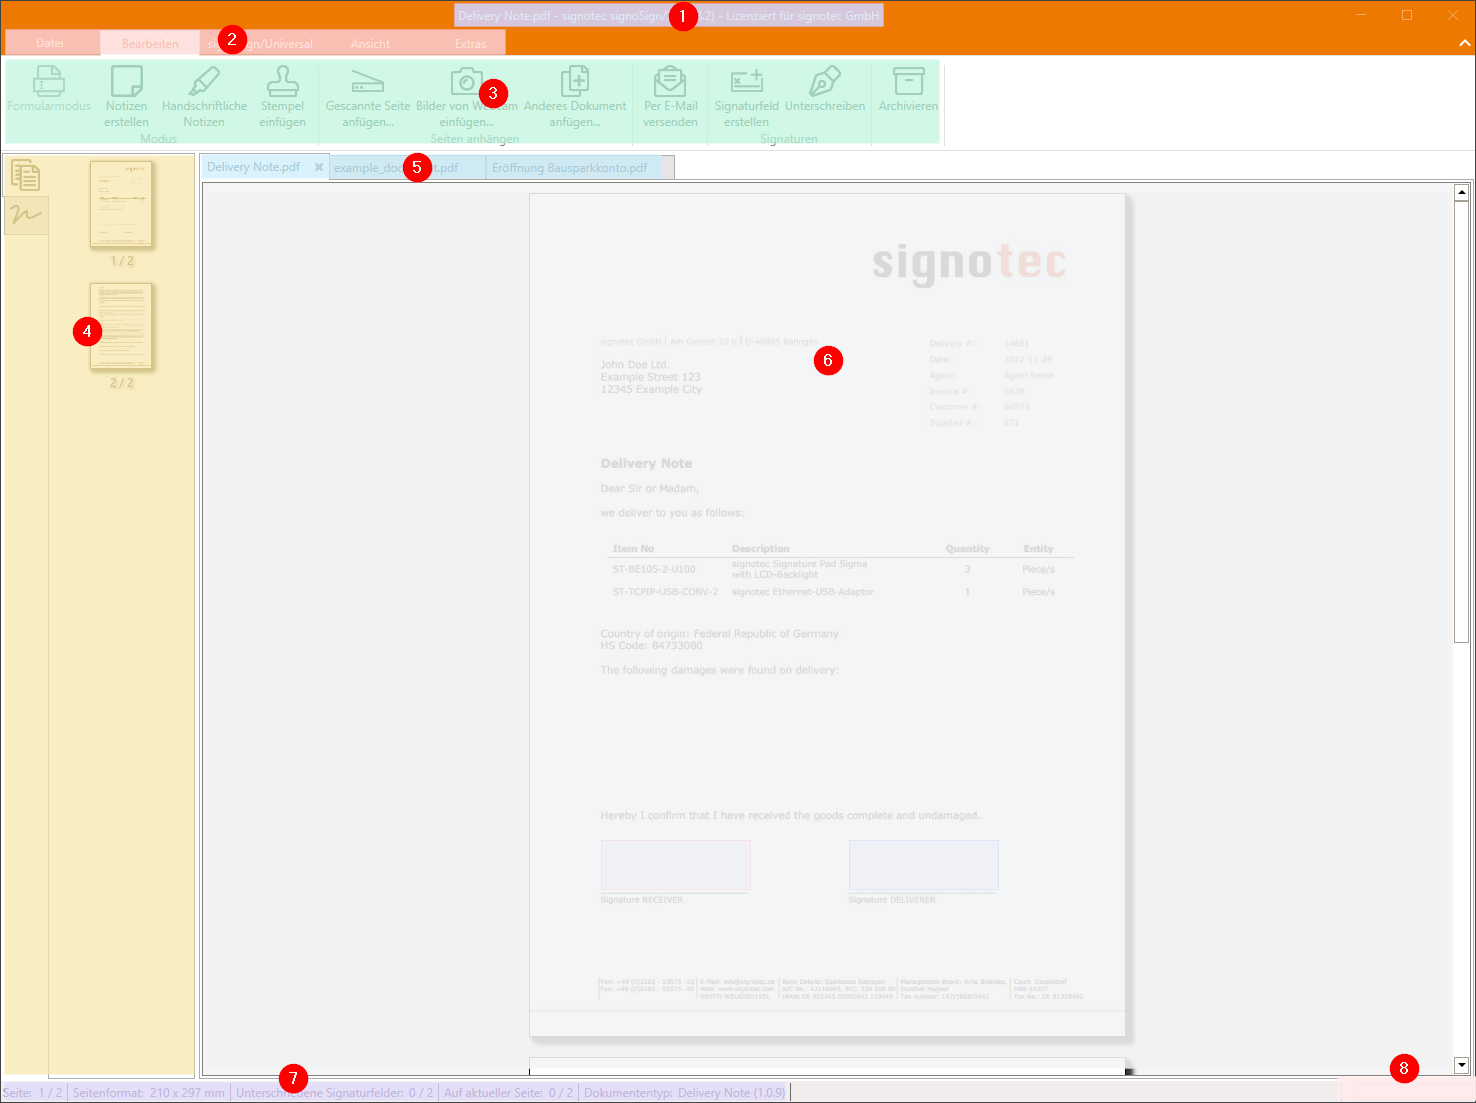
Screenshot: signoSign/2 main window
Description | Color | |
|---|---|---|
| 1 | The window title contains the name of the currently open document, the name of the software and the version number and licensee. | |
| 2 | In the main menu, ribbon tabs divide the program functions into individual areas. | |
| 3 | The toolbar below the ribbon tabs contains all the functions of the selected ribbon area. | |
| 4 | The sidebar on the left-hand side of the main window contains functions for navigating the document as well as information on the signatures and signature fields it contains. | |
| 5 | If several documents are open at the same time, they are displayed in individual tabs above the document display. The tabs can be used to switch between the open documents. | |
| 6 | The document display shows the currently open document centered in the software. Multi-page documents can be scrolled. All toolbar functions relate to the currently visible document. | |
| 7 | The status bar (footer) in the bottom left-hand corner of the main window contains information about the current document. | |
| 8 | The loading bar in the bottom right-hand corner of the main window indicates that the software is loading, e.g. when a document is opened. |
Settings
All general software settings are contained in the Tools → Configuration (F8) area.
Comprehensive information on all settings can be found in the section on administration and configuration.
First signature
Configure signature device
When a signotec signature pad is used, it is simply connected to the computer via USB.
If the signature pad is used locally on the PC, no driver installation is necessary. The device works on a plug-and-play basis and is automatically searched for and configured the first time a signature process is started.
If the signature pad is to be used in a remote desktop environment (RDP or Citrix), USB forwarding must be activated. This can be done via native USB forwarding or via virtual serial connections (devices with FTDI chip or signotec vCOM port driver). The signotec Virtual Channel driver is also available for Citrix. Further information can be found in the user manual and at http://www.signotec.com. As soon as the signature pad has been transferred to the virtual user session, it can be configured in signoSign/2. The automatic search first tries to find a native USB device. This search is initially without results and the user receives a message dialog. A search for serial devices can then be carried out in this dialog in order to activate the pad that has been passed through. This configuration is only required once.
The software saves the initial configuration. However, changing the signature pad is usually not a problem and the change is recognized automatically. The settings can be changed at any time via the signature device settings.
Create signature field
The “create signature field” tool can be used to create signature fields directly in the document.
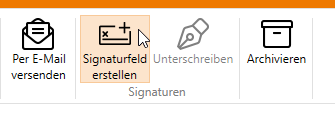
Screenshot: “Create signature field” tool
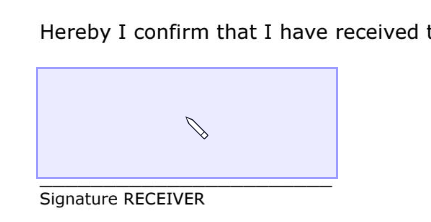
Once the function has been activated, the mouse pointer changes to a crosshair icon. A signature field can now be created anywhere in the document using the mouse. To do this, an area for the signature is selected at the desired position by “clicking and dragging.” As soon as the left mouse button is released, a signature field is created in the selected area. Any number of signature fields can be created in this way.

Screenshot: Positioning signature field
Capturing signatures
To enter a signature for an individual signature field, click the desired signature field in the document. The mouse pointer changes to a pen icon above the signature field.
Screenshot: Clicking signature field
Signature capture for the selected field is started immediately after clicking. The signature dialog appears on the PC. The signature can now be made on the connected signature pad.
The “sign” tool can be used to sign all signature fields one after the other. Here too, signature capture is started immediately for the first field. If the signature is confirmed or skipped, signature capture starts automatically for the next field. This is repeated until all signature fields of the document have been signed or skipped.
The “sign” tool is only active if there are empty signature fields in the document or if a signotec Delta signature pad is used.
Save document
To save the signed document, you can use the “save” or “save as…” function in the “file” menu.